Saturday 27 October 2007

Compiling a simple program for OpenWrt

Using the Openwrt Buildroot environment created below, it's now possible to compile our own programs programs and create my own packages for the ASUS WL-500g wireless client.

Following the procedure described in this how-to.

##############################################
<# OpenWrt Makefile for flabbybox program
#
# Most of the variables used here are defined in
# the include directives below. We just need to
# specify a basic description of the package,
# where to build our program, where to find
# the source files, and where to install the
# compiled program on the router.
#
# Be very careful of spacing in this file.
# Indents should be tabs, not spaces, and
# there should be no trailing whitespace in
# lines that are not commented.
#
##############################################

include $(TOPDIR)/rules.mk

# Name and release number of this package
PKG_NAME:=flabbybox
PKG_RELEASE:=0.12.1

# This specifies the directory where we're going to build the program.
# The root build directory, $(BUILD_DIR), is by default the build_mipsel
# directory in your OpenWrt SDK directory
PKG_BUILD_DIR := $(BUILD_DIR)/$(PKG_NAME)

include $(INCLUDE_DIR)/package.mk

# Specify package information for this program.
# The variables defined here should be self explanatory.
define Package/flabbybox
SECTION:=utils
CATEGORY:=Utilities
TITLE:=flabbybox -- an embbeded client for mpd
DESCRIPTION:=\
Command mpd via a keypad and LCD
endef

# Specify what needs to be done to prepare for building the package.
# In our case, we need to copy the source files to the build directory.
# This is NOT the default. The default uses the PKG_SOURCE_URL and the
# PKG_SOURCE which is not defined here to download the source from the web.
# In order to just build a simple program that we have just written, it is
# much easier to do it this way.
define Build/Prepare
mkdir -p $(PKG_BUILD_DIR)
$(CP) ./src/* $(PKG_BUILD_DIR)/
endef

# We do not need to define Build/Configure or Build/Compile directives
# The defaults are appropriate for compiling a simple program such as this

# Specify where and how to install the program. We install the executable
# by copying it to the /bin directory on the router and the config file to /etc
# The $(1) variable represents the root directory on the router running
# OpenWrt.
# The $(INSTALL_DIR) variable contains a command to prepare the install
# directory if it does not already exist. The $(INSTALL_BIN) contains the
# command to copy the binary file from its current location (the build
# directory) to the install directory.
define Package/flabbybox/install
$(INSTALL_DIR) $(1)/etc
$(CP) $(PKG_BUILD_DIR)/flabbybox.conf $(1)/etc/flabbybox.conf
$(INSTALL_DIR) $(1)/bin
$(INSTALL_BIN) $(PKG_BUILD_DIR)/flabbybox $(1)/bin/
endef

# This line executes the necessary commands to compile our program.
# The above define directives specify all the information needed, but this
# line calls BuildPackage which in turn actually uses this information to
# build a package.
$(eval $(call BuildPackage,flabbybox))

In order to use the usb library, we need to download and compile the libusb package

svn checkout https://svn.openwrt.org/openwrt/packages/libs/libusb/ package/libusb
make package/libusb-compile

In avoid running through the whole toolchain makefile, use the following commands to work on just a single package -

make package/-clean V=99
make package/-compile V=99
make package/-install V=99

Friday 7 September 2007

Adding keypad and LCD display to the ASUS WL-500g wireless client

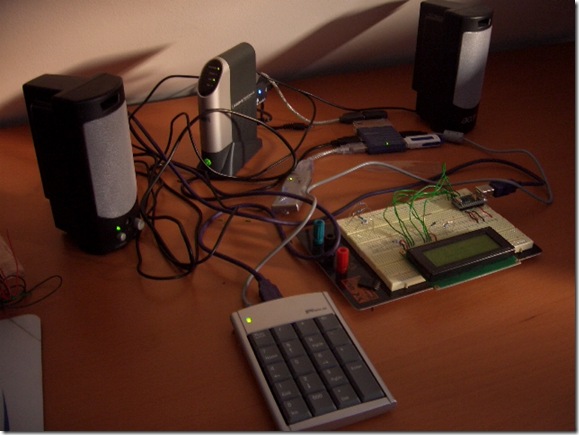
The UI for the wireless player is a Targus usb numeric keypad and a homemade usb 20x4 LCD display based on Phil Endecott's slugterm. Unfortunately, as explained in this OpenWrt forum post, USB HID (Human Interface Devices) support is not enabled by default in the OpenWrt kernels - you have to enable it in the kernel config file. After some googling, I found this howto which describes which kernel options are required - but first I needed to set up the build environment.

Following the OpenWrt wiki again, I download the OpenWrt BuildRoot onto my Linux laptop -

svn co https://svn.openwrt.org/openwrt/trunk

and then ran -

make menuconfig

- selected the 'Broadcom BCM947xx/953xx [2.4]' target system otherwise left everything else as default, then did -

make V=99

to build the toolchain (as well as all the packages and kernel itself which we don't really need to do yet - anyway of stopping this?). After a very long time (left overnight ..) it finished.

Now I was able to enable the required kernel configuration options which allow the usb-hid kernel modules to be built. Following the BuildRoot wiki again, I changed the kernel configuration settings by cd'ing to the linux build directory and running make menuconfig, e.g.:

cd build_dir/mipsel/linux
make ARCH=mips menuconfig

- selected the following kernel options -

Input core support --->
Input core support
[M] Keyboard support
< > Mouse support
< > Joystick support
[M] Event interface support
< > User level driver support

USB support --->
--- USB Human Interface Devices (HID)
USB Human Interface Device (full HID) support
[*] HID input layer support
[*] /dev/hiddev raw HID device support

- then had to edit both -

package/kernel/modules/other.mk
package/kernel/modules/usb.mk

to remove the dependencies on kernel-2.6 for the input-core, input-evdev and usb-hid modules.

I removed the stuff from the previous build to force modules to be rebuilt-

rm .image .modules

- then returned to the top level directory and ran -

make menuconfig

again, selected the newly enabled kernel module selections (input-core, input-evdev and usb-hid)

Input Kernel modules --->
Other modules --->
[M] kmod-input-core
[M] kmod-input-evdev
USB Support --->
[M] kmod-usb-hid

and then -

make V=9

This generated the three required packages in bin/packages -

kmod-input-core_2.4.34-brcm-1_mipsel.ipk
kmod-input-edev_2.4.34-brcm-1_mipsel.ipk
kmod-usb-hid_2.4.34-brcm-1_mipsel.ipk

I copied these to the router and installed them with ipkg -

ipkg install kmod-input-core_2.4.34-brcm-1_mipsel.ipk
ipkg install kmod-input-evdev_2.4.34-brcm-1_mipsel.ipk
ipkg install kmod-usb-hid_2.4.34-brcm-1_mipsel.ipk

Now when the usb keyboard is inserted, dmesg gives -

hub.c: new USB device 00:04.0-1, assigned address 3
hub.c: USB hub found
hub.c: 3 ports detected
hub.c: new USB device 00:04.0-1.3, assigned address 4
input: USB HID v1.10 Keyboard [ORTEK USB Keyboard Hub] on usb1:4.0
input: USB HID v1.10 Device [ORTEK USB Keyboard Hub] on usb1:4.1

and the keyboard is correctly recognised!

Wednesday 29 August 2007

Installing Music Player and usb sound card on the ASUS WL-500g wireless client

Following the wiki, I installed the appropriate kernel modules for an nfs client -
ipkg install kmod-fs-nfs
and then attempted to mount the filesystem export from the fileserver -
mkdir /tmp/music
mount -t nfs 192.168.1.77:/home/share/music /tmp/music -o nolock
then
ls /tmp/music
indeed shows the music directory from the fileserver -
root@OpenWrt:~# ls /tmp/music
2 Many DJ's
Acid House Kings
Al Green
Babyshambles
Barenaked Ladies
Buena Vista Social Club
Bugz in the Attic
Following the Usb Storage and Usb Audio wiki entries, I installed the appropriate kernel modules to enable my usb soundcard -
ipkg install kmod-usb-ohci kmod-soundcore kmod-usb-audio
Then, on plugging the soundcard in, dmesg gives -
hub.c: new USB device 00:04.0-1, assigned address 2
usbaudio: device 2 audiocontrol interface 0 has 0 input and 1 output AudioStreaming interfaces
usbaudio: device 2 interface 1 altsetting 0 does not have an endpoint
usbaudio: device 2 interface 1 altsetting 1 channels 2 framesize 2 configured
usbaudio: valid output sample rate 44100
usbaudio: valid output sample rate 48000
usbaudio: device 2 interface 1 altsetting 1: format 0x01000010 sratelo 44100 sratehi 48000 attributes 0x01
usbaudio: registered dsp 14,3
usbaudio: constructing mixer for Terminal 3 type 0x0301
usbaudio: registered mixer 14,0
usb_audio_parsecontrol: usb_audio_state at 807f8860
I then installed the Music Player application -
ipkg install mpd
and some other dependences that weren't properly flagged when mpd was installed -
ipkg install alsa-lib libpthread
editted the config file -

# MPD CONFIG FILE
# For a full description of all config parameters,
# Check the mpd man page, "man mpd".

##################### REQUIRED ###########################
music_directory "/tmp/music"
playlist_directory "/tmp/music"
db_file "/tmp/music/mpd.db"
log_file "/tmp/mpd.log"
error_file "/tmp/mpd.error"
pid_file "/tmp/mpd.pid"
##########################################################

##########################################################
# EVERYTHING ELSE IS OPTIONAL
##########################################################

################## AUDIO OUTPUT ##########################
#
# use this if you want to use OSS audio output
audio_output {
type "oss"
name "my OSS sound card"
device "/dev/sound/dsp" # optional
format "44100:16:2" #optional
}
#
# OSS Mixer
mixer_type "oss"
mixer_device "/dev/sound/mixer"
mixer_control "PCM"
#

################# SECURITY SETTINGS ######################
#
# It is encouraged to run MPD as
# non-superuser. If you start mpd as root
# (for example, in an init script), set
# this value, then mpd will drop root priveleges
# and runs as the user specified.
#
user "share"
#

################ MISCELLANEOUS OPTIONS ###################
#
port "6600"

added 'share' user and group (by editting /etc/passwd and /etc/group) so that we can properly read and write to the nfs share on the fileserver which is owned by user 'share'. Since we will be running mpd as user 'share', we need to open the permissions of /dev/sound/dsp and /dev/sound/mixer which were created by root
chmod 777 /dev/sound -R
Then try it ! First start the music player -
mpd
There may be a long wait while it builds the database before daemon starts up. Then can use the command-line controller to add all the files in the database to a playlist, shuffle it, then play -
mpc listall mpc add
mpc shuffle
mpc play
and lovely music!

In order for it all to start up properly on power-up of the router, create /etc/init.d/mpd -
#!/bin/sh /etc/rc.common
# Copyright (C) 2006 OpenWrt.org
START=70

start() {
mkdir /tmp/music
mount -t nfs 192.168.1.77:/home/share/music /tmp/music -o nolock
chmod 777 /dev/sound -R
mpd
mpc listall mpc add
mpc shuffle
mpc volume 10
mpc update
}

stop() {
killall mpd
umount /tmp/music
}
and then to set it up to run on router restart -
/etc/init.d/mpd enable

ASUS WL-500g as a wireless client/repeater

The Asus WL-500g router already had an old version of Openwrt White Russian firmware. I followed this advice from the Openwrt forums re installing Openwrt Kamikaze. Downloaded the appropriate firmware for the Asus WL-500g and loaded onto the router via the firmware upgrade function of webif (alternatively I could have used the the Asus upgrade utility).

After the usual logging on via telnet, changing root password etc described in the forum posting linked above, I followed the direction in this wiki article to configure the router as a wireless repeater.

Edited /etc/config/wireless -
config wifi-device wl0
option type broadcom
option channel 11

# REMOVE THIS LINE TO ENABLE WIFI:
option disabled 0

config wifi-iface
option device wl0
option network lan
option mode sta
option ssid NETGEAR
option encryption psk
option key LetterOfTheWeek

config wifi-iface
option device wl0
option network lan
option mode ap
option ssid Kitchen
option hidden 0
option encryption psk
option key LetterOfTheWeek
and /etc/config/network -
#### VLAN configuration
config switch eth0
option vlan0 "1 2 3 4 5*"
option vlan1 "0 5"

#### Loopback configuration
config interface loopback
option ifname "lo"
option proto static
option ipaddr 127.0.0.1
option netmask 255.0.0.0

#### LAN configuration
config interface lan
option type bridge
option ifname "eth0"
option proto static
option ipaddr 192.168.1.101
option netmask 255.255.255.0
option gateway 192.168.1.1
option dns 192.168.1.1

#### WAN configuration
config interface wan
option proto none

- to set up the router as a client with WPA encryption on the existing AP with an SSID of 'NETGEAR' and also as an AP itself with SSID 'Kitchen' which repeats the traffic with WPA encryption.

When the router is configured like this and rebooted, it becomes a client to an existing AP with an SSID of 'NETGEAR'. This client interface, the wired router ports and the new AP with SSID 'Kitchen' are bridged together with an IP address of 192.168.1.101. Wired or wireless clients attached to this bridge get their IP configuration in the 192.168.1.xxx subnet via DHCP from the NETGEAR access point. The routing table on the router is -

root@kitchen:~# route
Kernel IP routing table
Destination Gateway Genmask Flags Metric Ref Use Iface
192.168.1.0 * 255.255.255.0 U 0 0 0 br-lan
default 192.168.1.1 0.0.0.0 UG 0 0 0 br-lan
and the interfaces are -

root@kitchen:~# ifconfig
br-lan Link encap:Ethernet HWaddr 00:11:2F:90:E9:C4
inet addr:192.168.1.101 Bcast:192.168.1.255 Mask:255.255.255.0
UP BROADCAST RUNNING MULTICAST MTU:1500 Metric:1
RX packets:65205 errors:0 dropped:0 overruns:0 frame:0
TX packets:41138 errors:0 dropped:0 overruns:0 carrier:0
collisions:0 txqueuelen:0
RX bytes:33390624 (31.8 MiB) TX bytes:7736272 (7.3 MiB)

eth0 Link encap:Ethernet HWaddr 00:11:2F:90:E9:C4
UP BROADCAST RUNNING MULTICAST MTU:1500 Metric:1
RX packets:0 errors:0 dropped:0 overruns:0 frame:0
TX packets:5281 errors:0 dropped:0 overruns:0 carrier:0
collisions:0 txqueuelen:1000
RX bytes:0 (0.0 B) TX bytes:512332 (500.3 KiB)
Interrupt:3

lo Link encap:Local Loopback
inet addr:127.0.0.1 Mask:255.0.0.0
UP LOOPBACK RUNNING MTU:16436 Metric:1
RX packets:232185 errors:0 dropped:0 overruns:0 frame:0
TX packets:232185 errors:0 dropped:0 overruns:0 carrier:0
collisions:0 txqueuelen:0
RX bytes:28677026 (27.3 MiB) TX bytes:28677026 (27.3 MiB)

wl0 Link encap:Ethernet HWaddr 00:11:2F:90:E9:C4
UP BROADCAST RUNNING MULTICAST MTU:1500 Metric:1
RX packets:88661 errors:0 dropped:0 overruns:0 frame:92666
TX packets:74755 errors:17 dropped:0 overruns:0 carrier:0
collisions:0 txqueuelen:1000
RX bytes:46906044 (44.7 MiB) TX bytes:22477020 (21.4 MiB)
Interrupt:6 Base address:0x2000

wl0.1 Link encap:Ethernet HWaddr 00:11:2F:90:E9:C4
UP BROADCAST RUNNING MULTICAST MTU:1500 Metric:1
RX packets:0 errors:0 dropped:0 overruns:0 frame:0
TX packets:0 errors:0 dropped:0 overruns:0 carrier:0
collisions:0 txqueuelen:1000
RX bytes:0 (0.0 B) TX bytes:0 (0.0 B)

Setting up NFS on the NSLU2 fileserver

Will want to export NFS shares from the fileserver as well as Samba. Followed advice from DebianHelp.
apt-get install nfs-kernel-server
edited /etc/exports to add -
/home/share/music *
then update the running server by doing
exportfs -a

Tuesday 19 June 2007

Installing rsync to automate backups onto the NSLU2 Fileserver

Install rsync on the Fileserver -

apt-get install rsync

edit /etc/rsyncd.conf

# rsyncd.conf
uid = share
gid = share
use chroot = yes
max connections = 2
syslog facility = local3
pid file = /var/run/rsyncd.pid
[GiddyKipper]
path = /home/share/backups/GiddyKipper
comment = nslu2 rsync backup of GiddyKipper
read only = no
[SillySausage]
path = /home/share/backups/SillySausage
comment = nslu2 rsync backup of SillySausage
read only = no

Started rsync in daemon mode -

rsync --daemon

Should now be able to see the rsysnc server from another machine on the LAN -

andrew@giddykipper:~$ sudo rsync fileserver::
GiddyKipper nslu2 rsync backup of GiddyKipper
SillySausage nslu2 rsync backup of SillySausage
andrew@giddykipper:~$

Clients 'push' backups onto the server - i.e. to back-up my Linux 'home' directory on GiddyKipper -

rsync -arv --delete /home/andrew/ fileserver::GiddyKipper/andrew/

In order for this backup to run daily, the following script is added to /etc/cron.daily

#!/bin/sh
#
# backup cron daily
rsync -arv --delete /home/andrew/ fileserver::GiddyKipper/andrew/

For Windows machine, need to install cygwin, and then install rsync within cygwin. Backups are run as -

rsync -arv --delete /cygdrive/c/Documents\ and\ Settings/Rachel/ fileserver::SillySausage/Rachel/

and can include explicit exclude options to avoid lots of junk -

--exclude '*/Temporary\ Internet\ Files/*'

To run regular backups, need to add something like the following script to "Scheduled Tasks" to be run as an Administrator -

c:
cd c:\cygwin\bin
bash --login -c "rsync -avr --log-file=/cygdrive/c/backup.log --delete --exclude '*/Temporary\ Internet\ Files/*' /cygdrive/c/Documents\ and\ Settings/Rachel/ fileserver::SillySausage/Rachel/"

Setting up Samba on the NSLU2 Fileserver

Added an new user 'share' with password 'share'

adduser share

This also automatically creates a directory /home/share. Added new directories in /home/share to store the data to be shared by samba -

cd /home/share/
mkdir music
mkdir pictures

mkdir backups
mkdir videos

mkdir /home/share/backups/GiddyKipper
mkdir /home/share/backups/SillySausage

- and changed the owner of the directories to 'share'

chown share:share /home/share -R

Installed samba

apt-get install samba

edited /etc/samba/smb.conf

# Global parameters
[global]
workgroup = OURHOUSE
netbios name = fileserver

server string = Our Fileserver

security = SHARE

#turn off printing!
load printers = no
printing = bsd
printcap name = /dev/null
disable spoolss = yes

[music]
comment = Shared Music Files
path = /home/share/music
force user = share
force group = share
read only = Yes
guest ok = Yes

[pictures]
comment = Shared Pictures
path = /home/share/pictures
force user = share
force group = share
read only = Yes
guest ok = Yes

[videos]
comment = Shared videos
path = /home/share/videos
force user = share
force group = share
read only = Yes
guest ok = Yes

[backups]
comment = Network backups
browseable = No
force user = share
force group = share
read only = Yes
guest ok = Yes

[shares-admin]
comment = Admin access to the shares
browseable = No
user = share
read only = No
guest ok = No

Added a samba user called 'share' with password 'share'

fileserver:~# smbpasswd -a share
New SMB password:
Retype new SMB password:
Added user share.

And checked he was there OK -

fileserver:~# pdbedit -L
share:1001:,,,

Restarted samba to force rereading of the config file (update: actually don't need to do this - config file is re-read every 60 seconds)

/etc/init.d/samba restart

- and then check to see if shares are exported.

The shares 'music', 'pictures' and 'videos' should be visible to everyone - but no writes or deletes allowed:

Noname 

The 'backups' share isn't shown above because it isn't browsable - but it's there readonly for everyone as well if you type the full share name in:

Noname2

Typing in the full path of the 'shares-admin' share brings up a password dialog box and you have to log in as the samba user 'share' as created above before the share is accessable (full read write access):

Noname3

Installing Debian on the NSLU2 Fileserver

My first attmpt to reflash the NSLU2 with Debian Etch using the Debian Installer repeatedly failed while downloading packages from the mirrors (Next time I try it I'll make more detailed notes of what went wrong!) - so instead I used the manual method described here. This uses a tar ball prepared by Martin Michlmayr which just needs to be unpacked into the target filesystem.

Firstly, I partitioned the usb diskdrive. I plugged the drive into my laptop running Ubuntu 7.04 and used fdisk to create the required partitions. In order to match Martin's tar ball, I created /dev/sdb1 for the root partition (size 3000M), /dev/sdb2 as an extended partition from which I created /dev/sdb5 for the swap partition (700M) and /dev/sdb6 for the home partition (the remainder of the disk ~ 36G) are created. I also used fdisk to make /dev/sdb1 bootable and to change the type of /dev/sdb5 to 82 (Linux swap).

(...I had to reboot the laptop and then unmount the automounted usb disk before the next step...)

I then formatted the drive –

mkfs.ext3 /dev/sdb1
mkfs.ext3 /dev/sdb6
mkswap /dev/sdb5

- and mounted it on the laptop -

sudo mount /dev/sdb1 /mnt/tmp

I got the tar ball from -

wget http://people.debian.org/~tbm/nslu2/etch/base.tar.bz

- and unpacked it onto the root partition of the prepared drive -

cd /mnt/tmp
bzcat ~/base.tar.bz2 tar -xvf -

I then had to manually install the proprietary firmware that is needed for the in-built Ethernet chip, following the instructions on the NSLU2-Linux wiki describing how to extract this firmware from an installer image, as follows -

Firstly I downloaded the debian-installer image from slug-firmware.net and unpacked the image using slugimage (the version of slugimage packaged for Ubuntu was too old - I got my version from the Unslung CVS.)

slugimage -u -i di-nslu2.bin

- endian swapped the initramfs (ramdisk.gz).

devio '<< ramdisk.gz; xp $ 4' > ramdisk-swap.gz

- unpacked the initramfs

mkdir initrd; cd initrd
zcat ../ramdisk-swap.gz cpio -i

(there were lots of errors here relating to file permissions - but the firmware seems to have been extracted OK)

The NPE microcode firmware was in the initrd/lib/firmware directory - called NPE-B.01000201. I copied this file to /mnt/tmp/lib/firmware, and then created a symbolic link in /mnt/tmp/lib/firmware called NPE-B which points to NPE-B.01000201.

sudo cp NPE-B.01000201 /mnt/tmp/lib/firmware/
cd /mnt/tmp/lib/firmware; sudo ln -s NPE-B.01000201 NPE-B

The filesystem was now prepared, so I put the NSLU2 in upgrade mode and flashed the etch firmware image using upslug2 (the version packaged with Ubuntu was OK).

sudo upslug2 -i sda1-2.6.18.dfsg.1-12.bin

I connected the hard drive when upslug2 had finished and the NSLU2 rebooted the new Debian system. The system obtained an IP address via DHCP on eth0. I was able connect via SSH with user root and password root.

First thing I did was changed the root password -

passwd root

- regenerated the ssh keys

ssh-keygen -f /etc/ssh/ssh_host_key -N '' -t rsa1

ssh-keygen -f /etc/ssh/ssh_host_rsa_key -N '' -t rsa
ssh-keygen -f /etc/ssh/ssh_host_dsa_key -N '' -t dsa

- edited /etc/network/interfaces to give a static IP address

# This file describes the network interfaces available on your system
# and how to activate them. For more information, see interfaces(5).

# The loopback network interface
auto lo
iface lo inet loopback

# The primary network interface
allow-hotplug eth0
iface eth0 inet static
address 192.168.1.77
netmask 255.255.255.0
gateway 192.168.1.1

- added a normal user andrew

adduser andrew

- changed the host name by changing 'foobar' to 'fileserver' in /etc/hostname and /etc/hosts

I then rebooted to make sure I could still log in (I could as user andrew and as root ...) then edited /etc/apt/sources.list to point to local mirrors as well as the contrib and non-free repositories -

deb http://ftp.uk.debian.org/debian/ etch main contrib non-free
deb-src http://ftp.uk.debian.org/debian/ etch main contrib non-free
deb http://security.debian.org/ etch/updates main contrib non-free
deb-src http://security.debian.org/ etch/updates main contrib non-free

and upgraded -

apt-get update
apt-get dist-upgrade

There was a kernel upgrade required, but no packages required updating.

Next - installing samba ...

Monday 18 June 2007

Introducing Flabbybox

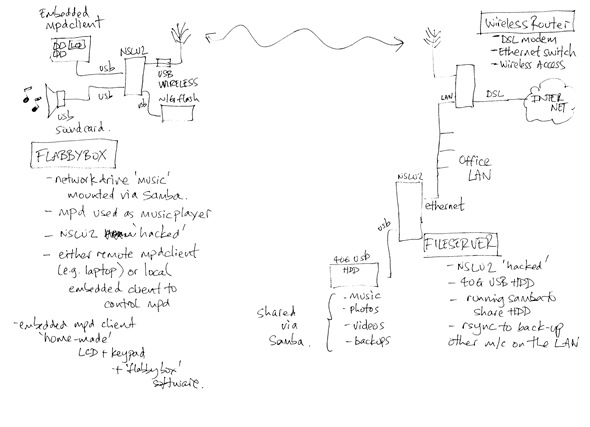
This was the basic idea -

IMAGE0027

The FileServer consists of -

  • Linksys NSLU2 from ebuyer hacked to run Openslug
  • Western Digital 40GB Scorpio 2.5" drive from ebuyer
  • Dynamode USB2.0 Caddy For 2.5" Hard Drives from ebuyer

The Flabbybox itself consists of -

System has been working fine for some time, but I now need to update it -
  • Need to update my wireless network security to WPA, but this is not supported in the version of OpenSlug I'm using
  • I want to move to Debian, on the fileserver at least, in order to have a 'proper' operating system for when I connect it to the internet.
  • I want to try simpler platforms for the client, such as wireless routers running Openwrt and save the NSLU2 for harder jobs.

Aim of this blog is to document the work, so I don't forget how I did it again!

CIMG1807